Sunday, July 28, 2013

Mickey Mouse and Minnie Mouse

I know it's been a long time since I updated this. It's not like I have not been able to scrapbook, it's just that I have not been able to get onto a computer for a long time. I've been wanting to post this for some time now and think it's a great idea to show how I make something step by step. Well, here is how I make little Mickey and Minnie Mouse.

You will need Black, White, and Red paper. 


 Step 1. Punch out Black circles, you will need 8 of them. {but it won't hurt to punch out more just in case}
Step 2. Punch out Red circles, you will need 3
Step 3. take 4 black circles and cut them smaller {if you have a smaller circle punch, you may want to just punch out 4 of them- for the ears} I just simply use my scissors to make them smaller.
Step 4. is just a pic of what step 3 should look like
Step 5. use a hole puncher and punch out white paper
Step 6. take one Red circle and cut in half
Step 7 take another Red circle and wavely cut it in half
 Step 8. You can either use glue-dots, tape, or whatever, I used my little X-sticker maker for all the pieces.
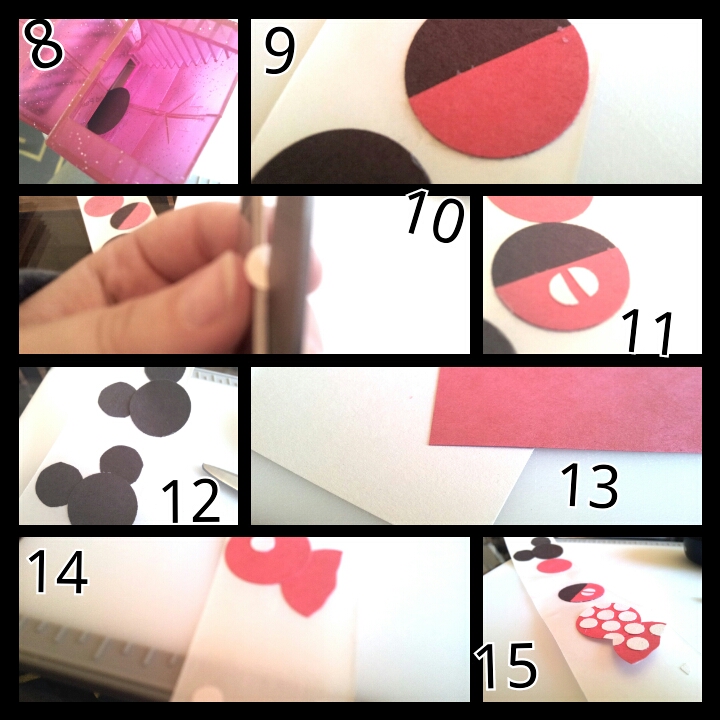
Step 9. I start putting the pieces together-- for Mickey I take the half Red circle and put it onto a black circle
Step 10. I cut one of the hole-punched circles in half
Step 11. then I put them onto the Mickey's pants like so..
Step 12. I put the ears under the Black circles to make it look like Mickey mouse
Step 13. I then cut out Red and White squares 4x4 for the background {not required}
Step 14. I then put together Minnie Mouse... Put the wavy half circle under a Red circle, then add a bunch of the white hole punch circles onto it
Step 15. what it looks like

Step 16. I then put the 4x4 squares down onto the card {or in this case a small home-made notebook}, then put down the bottom parts of each characters down like so.
Step 17. I then add the head to the body
Step 18. I draw a small bow on a red circle 
Step 19. then i cut it out carefully
Step 20. add the bow

and that is how i make it. I am sure that there are other ways, but this is how i decided to do it. I love making little note-book, and the kids love it too.. For that i just grab about 6 paper and a colored paper for the cover, cut it 10x6 then fold the 10in in half to make the notebook 5x6... then staple it together. Then they can draw in it, add stickers, or whatever they want inside. for the smaller kids, i would cover the cover with tape so that the small pieces didn't get all over the place. :D

Thank you for looking!
-Dayna

Tuesday, January 22, 2013

My Brother's Wedding Book!

 Another Scrapbook I did for someone else. I did this one for my older brother's wedding. For this type of Layout, I always placed the pictures wherever I want them to go. I had the Groom-men on one side and the Bride-maid on the other side. I always use colors that are in the pictures and have it for both sides. In this case, I used pink for girl's side and blue for the boy's side, but the green in both. Green is my sister in law's favorite color, so I incorporated green into the scrapbook along with blue which is my brother's favorite color. After I put the pictures where I like them, I cut out scrap-paper to fit into the blank places. Then I tape down the papers and add stickers or little thin items {like buttons or ribbons}.

I have recently gotten into buttons and using them into my pages somehow. With each scrapbook I do, I make it so it will fit the person's interests and personalities yet have "Dayna" in each page. With my brother's wedding book, I had over 200 pictures to work with, so I did not used every picture but a lot of the pictures were very close to each other that I did not have to use every single one {like 4 pictures of the same pose and background but some are blurry or whatever}. For this, Love, I had tied a string in the button and then glued it down to the paper. I then wrote the word "L-ve" with the button as "o". If you had glued the button down, you can still put the sting in the button by "sewing' it onto the paper.

With my brother's scrapbook, I made their first page be their dating/engagement page. My brother had gotten a autographed Red-Wing picture of my sister in law's favorite player and had him write "---{name}--- say yes!" and then my brother got onto his knees and asked her to marry her after she got the picture. And they are now happily married!

With this page, I cut out the pictures and scrap paper into squares with my square-puncher. I then added stickers onto it.


I then made a page of their settings and cake. I have these wood-letters that I keep in ABC order and use as my sketches to trace into the paper I want the letters to be on. I trace them on backwards so that the pen mark isn't on the front or that the letters will not be backwards. I glued on the ribbons that they had on their tables for anyone to have. The ribbons had their names and date on it. I inked the little white envelopes into green to match the ribbons. I had rounded the picture's corners and matted the two bottom pictures. As I am picking out papers to use, I make a pile of what I would like to use and then pick from that pile of what will go with each picture that I am using on the page.

I left room for journaling, which I used transparent paper and inked the edges then added embellishments to them. I kept the pattern for the top the same, just with different pictures. I ALWAYS put the pictures and paper down before I tape them down, because sometimes I may want to change things up before I tape them down.


 In a Scrapbooking Magazine I saw this idea of photo-strips into a shape, so I wanted to try it out. I first cut out a heart in black paper. I then placed the pictures {all the same size... I think I did 2x4in.. but I do not remember right now}. I of course changed the pictures around to where I like them then taped them down. I then cut off the pictures that were hanging off the edges of the heart. I then taped the heart onto a scrap-paper and cut out the heart shape around the smaller heart.


I then taped the heart down where I wanted it {a bit off the edge, and then cut that off too}. I printed a picture onto transparent paper and made a white heart. I then glued the transparent down to the white paper where I liked the picture placement and then cut off the edges. I made a journaling area with a transparent heart that I included heart-shaped braids. I had used white ink on a few stamps for the background.

Of course this isn't every page of the scrapbook, but these are some of my favorite pages from that scrapbook. I think that more I blog, the more details and pictures of what I do will happen. May you have a blessed day!

Monday, January 21, 2013

Welcome!!

Thank You so much for coming to this blog. I would love to start this blog off introducing a little bit about myself. My name is Dayna and I love to be creative. I am 27 years old right now and have been really into Scrapbooking since I was about 13 or 14 years old. I am #3 out of 6 kids. I love to Scrapbook, clean, read, walk, work with kids, and help people out. I love making scrapbooks for others and using my talent to make something out of the pictures given to me. I am very open about a special guy in my life, my son. I had given him up for adoption and I am very blessed to be his birth-mom. Tho, his story is a whole amazing story in itself and would love to tell you about it if you really want to know. But this blog is about my journey in being creative and sharing with you the blessing I receive as I make a book for someone. Maybe you are looking at this blog and would love for me to make you one, and to be honest, I would love to make one for you with your pictures that you want me to use. Or maybe you want to use some of my ideas that I come up with, or ideas I saw from somewhere else... that is fine too. So enjoy seeing my Creative Scraps that I make and enjoy getting to know more about me. I too would love to get to know you too! :D

A few years ago I was very blessed to make a Scrapbook for my friend's wedding. I had such a blast cutting up their pictures and using their pictures in creative ways. When I do someone else's Scrapbook I try to leave room for journaling. Now, I am not perfect in my scrapbooking as I am not a perfectionist like a lot of scrapbookers are. The Photographers did a great job taking their pictures, and I had fun editing a few pictures a wee-bit.

 This was my second time doing a Scrapbook for someone and for a wedding. I think my scrapbooking skills from my first one has grown so much. I love trying new things and love using what I have in my scrapbooking items. I do look forward to doing my own wedding scrapbook some day. I try to put a bit of the Bride and a bit of the Groom into each page {favorite color, favorite shape...etc}.


I think that is is very awesome when I come up with an idea on my own, and later see someone else doing the same kind of idea in their own way. I often take someone's idea and put my own spin on it. This page of the cake is indeed my favorite layout I created on my own. I had saw a book shelf that was placed together in a very unique way, so I put my own spin on that into scrapbooking. Each time I do the layout, it turns out differently either because of the size of the pictures or the size of the scrap-paper I am using. I think that is why I use that layout more than any other layout I came up with. I do not draw out my layouts, only because it is always different.

I am very blessed that I made them their scrapbook and that they trusted me with their pictures to use how-ever I liked. I was also very blessed to have been at the wedding and share in their memory of saying "I Do!" to each other. I also am very blessed to see their love for each other getting stronger with each year and watching their children {for now a son} grow up.

I will end this post right here. I do have a bunch more pages to share with you of other scrapbooks that I had the blessing to do. But I will not overwhelm you with my awesomeness {just kidding!}. May you have a great and blessed week!